EXPERIMENTATION
Logo And Branding Designs


FULL COLOUR
This kind of logo will be used primarily for all of the areas that the people viewing my content will see. This is because it is the logo that has the most effort and detail put into it and it is also the logo which looks most appealing to the eye which was the intended design and reasoning behind it.
WHITE REVERSED:
This logo may be used on some areas of my work where the light of the page is darker, this kind of logo may be used on my Twitter page as with some of the new Twitter updates it has made the background area of the application much darker and i feel this logo would mix in better as a result.
BLACK (MONO)
This logo could double as both keeping the black outline and having the white background to contrast it, but it could also be used as a demonstration of what the image may look like with the background deleted. This form of logo may be useful on places such as a text document.
Product Design Experimentation


My ideas behind this label design for a fictional drinks product was to take a comedic approach and create something which is already a branded product and change it into something you would never expect to see as a drink.
I did this by sampling areas from the original product such as the manufacturing company name, the font used for the logo, shapes used and also the colour scheme.


My plan behind this was to take a different approach to some other people in the class and create a box which looks like the thing I am trying to base it off by using small details to build the bigger picture. I have also been able to utilise existing branding features such as the Royal Navy logo and Royal Navy colour schemes too.
Drinks Lighting Edit
This video allowed me to explore and experiment in the features which build and create a good promo video. This includes how lighting can effect the perception and mood of your video. Furthermore we explored the different sophisticated camera equipment that we had available to us such as the automated slider. I intend on experimenting with the automatic slider later on in the project so that i can use it for my final outcome.

Shot Types

Exploring how lighting and camera angles can effect an image or video is a key and important skill for me to learn. This is because it allows me to change how an image is perceived and interpreted, i have come to learn that the reasons an image can be seen differently is because of the different lighting used and the angles in which the shot is taken from, for example if i have a low camera angle with darker lighting it will be seen as sad and gloomy. Where as if i had a bright and colourful lighting array and a high or flat camera angle it will be more attention grabbing and is seen as happy/informative etc.
Product Design Drafts


1st Draft
2nd Draft (Final)
When looking into the actual physical design for my product, i had to consider how i was going to pull together all of the skills that i researched and learnt, to create a product which embodies everything good with what i saw. On the first draft the basic design was discovered, with the basic bottle theme found and the background and label design being made. The biggest change between that and the final draft was based on feedback from peers and that was that it needed to be more bright and colourful so that it would attract attention better. Using feedback from my peers helped me greatly as it allowed me to see it from a different perspective and therefore pickup on the areas of improvement which i may have missed myself.
Flyer/Poster Competition


Flyer
Poster
This lesson was very beneficial and helpful to me as it allowed me to gain knowledge into small details with regard to product placement etc that I wasn't aware of before. For example we were showed and given examples of how flyers and posters differ, as well as this it was important for us to understand what positives and negatives each of these have. Furthermore it was important for us to therefore take the information we now knew and understand how different situations may require either of the two. Leaving this lesson I had gained confidence in how i was going to use flyers and posters to my benefit when creating and using these skills in my final outcome.
DSLR Workshop
Apeture

The lack of light coming into the camera has caused this image to come out dark and under exposed.
Here we can see near enough the correct amount of light is making its way into the camera resulting in a fairly normal image.

In this image too much light is making its way into the camera and therefore is over exposing it and causing it to blur slightly.
Kelvin Scale
Here we are telling the camera what light to add to make the picture balanced. Too much cold has been adjusted making it look blue.

In this image a good compensated image has been created because the correction amount matches the light already in the picture.

In this photo the opposite to the cold image has occurred, too much warmth has been added making the photo come out orange almost.

Shutter Speed

By keeping the shutter speed in higher numbers it means the image looks as our eyes would see it. It can however effect depth and cause blur.

By reducing the shutter speed moving objects can begin to blur if they are further away from the camera.

By reducing the shutter speed to almost as low as the camera will go it reduces distant objects to an almost unrecognisable blur.
Experimentation Of Techniques
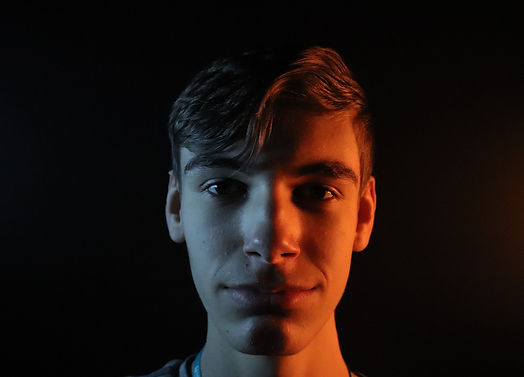
Lighting
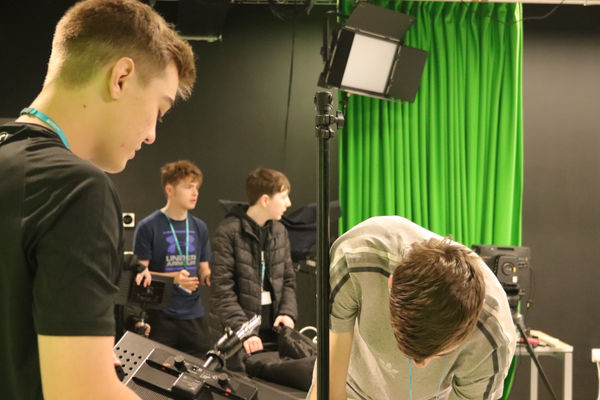


Myself, Joe And Fin
setting up the lighting equipment.
Joe in front of the green screen just before the first lighting technique is to be tested.
Myself, Joe And Finn setting up the tripod to hold the key lights that we would be using.
In this technique we were testing the practicability of certain lighting skills to see the effect that it had on the shot. We explored use of filters, reflective materials (to create shadows etc) and flat lighting a green screen to create an even light paste across the shot. This was very helpful to me as it was not something i had thought too much about previously however now i know about it i have noticed the impact it has on shots. We ran into some issues with the green screen test as we hadn't back lighted behind joe enough so if was making some background shadows which would prove difficult to remove. We fixed this by placing a light behind joe to even out the light. I will use these techniques in my final outcomes so that i can have full control over every factor of a shot.
Rhino 42" Automatic Slider

Picture Of The Setup Test
Video Of The Slider In Action
In this piece of experimentation i knew i wanted to explore a piece of unique and sophisticated equipment that i hadn't used before to see if any of it could be used to make my process easier and also allow it to go quicker. I decided on using the automatic rhino slider to see if it could allow my sliding shots to become smoother and easier to film. In the tests we conducted it was quicker, smoother and more efficient to use the automatic slider in comparison to a hand held shot or a gimbal rig. The time it took to film a static sliding shot with the slider was almost half of that required if we were to use a hand held Steadicam rig. I intend therefore on using this piece of equipment in my Final Outcome creation in order to keep production time down and create ease of use for me which would allow me to focus on some of the smaller details such as angles or lighting.